Installing a wall-mounted shower valve can significantly enhance your bathroom experience. Understanding how to install a wall-mounted shower valve is essential for both aesthetics and functionality. This task might seem daunting at first, but with the right guidance, it can be manageable. Choosing quality materials is crucial. A good valve ensures durability and performance.
Many homeowners underestimate the complexity involved. Mistakes in measurement or installation can lead to leaks. This is not just an aesthetic issue; it can damage surrounding structures. Taking the time to plan and prepare can save you time and frustration later. Consider your plumbing skills and whether you might need professional help.
In this guide, we'll share ten best steps to install a wall-mounted shower valve. These steps are designed for both novices and experienced DIYers. Get ready to transform your space with proper techniques and detailed instructions for success. Each step will aim to empower you, but remember, reflection on your progress is key.
Choosing the right location for a wall mounted shower valve is crucial for both functionality and aesthetics. A survey conducted by the American Institute of Architects shows that 68% of homeowners prioritize accessibility in bathroom design. Positioning the shower valve within easy reach enhances safety and comfort, especially for children and seniors.
Consider the height from the floor. The standard height for a shower valve typically ranges between 38 to 48 inches. This recommendation follows guidelines from the National Kitchen and Bath Association, ensuring a comfortable experience for most users. Be mindful of any obstructions, such as plumbing lines or wall studs, which can impact placement.
Planning the layout is essential. A poorly placed valve can lead to water waste due to unnecessary adjustments. Additionally, it's important to reflect on the overall design of your bathroom. Compatibility with existing fixtures and tiles is key to creating a cohesive look. This consideration might require adjustments that can complicate the installation process. Balancing aesthetics with practicality can be challenging, yet it is vital for long-lasting satisfaction.
| Step | Description | Location Considerations | Tools Needed |
|---|---|---|---|
| 1 | Select appropriate valve type | Ensure compatibility with shower type | None |
| 2 | Choose valve location | Consider accessibility and plumbing | Measuring tape |
| 3 | Cut a hole in the wall | Follow manufacturer specifications | Drywall saw |
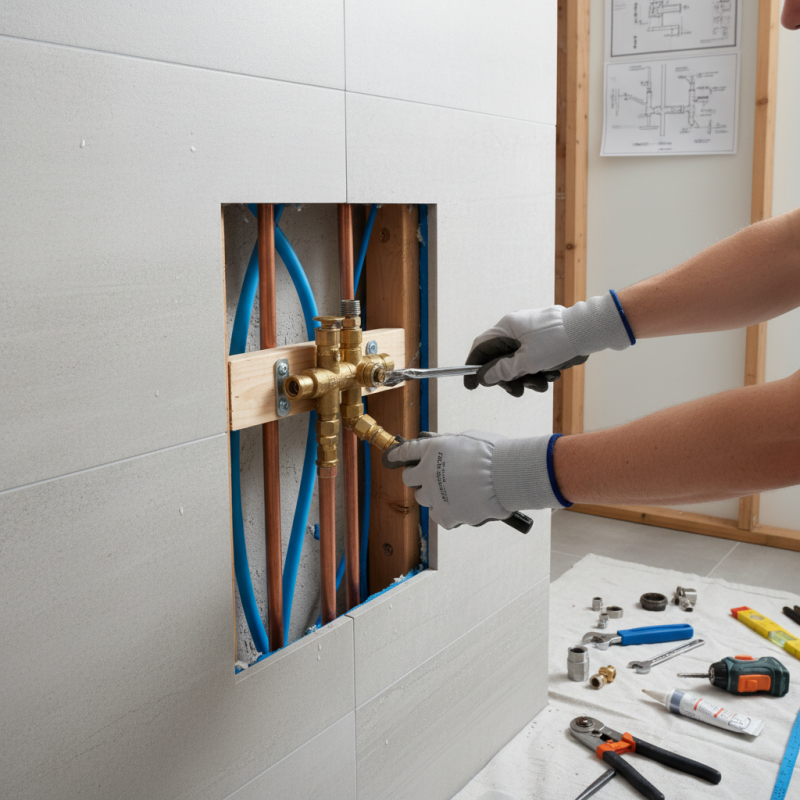
| 4 | Install plumbing connections | Ensure proper alignment | Pipe wrench |
| 5 | Secure the shower valve | Check for stability | Screwdriver |
| 6 | Attach water supply lines | Follow plumbing codes | Plumber's tape |
| 7 | Check for leaks | Test with water | None |
| 8 | Close up wall | Ensure a clean finish | Drywall compound |
| 9 | Install trim and fixtures | Match design specifications | Drill |
| 10 | Final test | Check all functions | None |
: You will need a wrench, screwdriver, level, Teflon tape, and either PVC or copper piping.
Preparation helps you avoid mistakes and makes the process smoother. It’s essential for safety and effectiveness.
Precise measurements and attention to detail are crucial. Poor installation often leads to failures.
High water pressure can damage the valve. A pressure regulator might be necessary to protect your system.
After installation, run the shower. Check all connections carefully. Testing is vital to avoid future water damage.
Yes, wear protective gear like gloves and goggles. Safety should always be your priority when working on plumbing.
Check the space around the shower for obstacles. Adjust your layout to accommodate the new valve properly.
Yes, consulting professionals can provide insights that DIY resources might miss. It can save you headaches later.
Regular checks can help ensure longevity and prevent unexpected leaks from developing over time.
Poor joint preparation and inadequate fittings are common causes. Always use high-quality materials and methods.
This article guides you through how to install a wall mounted shower valve with clear and concise steps. Start by choosing the right location for your valve, ensuring it is accessible and suitable for plumbing connections. Next, gather all the necessary tools and materials to facilitate a smooth installation process.
Preparation is key; properly prepare the plumbing and wall structure before proceeding to the installation. Once ready, follow the steps to install the wall mounted shower valve and make the required connections. Finally, test the installation to check for leaks and ensure everything functions properly. With these organized steps, anyone can confidently tackle the project of installing a wall mounted shower valve.