Learning how to install a thermostatic mixing valve properly is a safety task, not merely a plumbing upgrade. The U.S. Consumer Product Safety Commission reports approximately 3,800 tap-water scald injuries and 34 deaths each year. The World Health Organization also identifies burns as a significant household injury risk. These figures make temperature control more than a comfort issue. It can prevent a child’s hand from meeting dangerously hot water at a bathroom tap.
Gary Klein, P.E., a respected water-efficiency and plumbing-safety expert, states, “The goal is safe, comfortable hot water at the point of use.” That principle guides this installation overview. It covers valve orientation, hot-and-cold connection checks, strainers, check valves, flow direction, temperature adjustment, and final testing. ASSE 1017 and ASSE 1070 provide important performance references for master thermostatic valves and point-of-use devices. Local plumbing requirements still matter.
Small errors can create large consequences. A reversed connection may deliver unstable temperatures. A missing check valve can allow unwanted cross-flow. An untested outlet can hide a scalding hazard. Use a calibrated thermometer, not your hand. A perfect-looking installation may still perform poorly under changing pressure. This guide cannot replace the manufacturer’s instructions or a qualified plumber’s judgment. Still, it can help readers understand how to install a thermostatic mixing valve with greater care, clearer verification, and fewer assumptions. Safety depends on testing, not appearance.
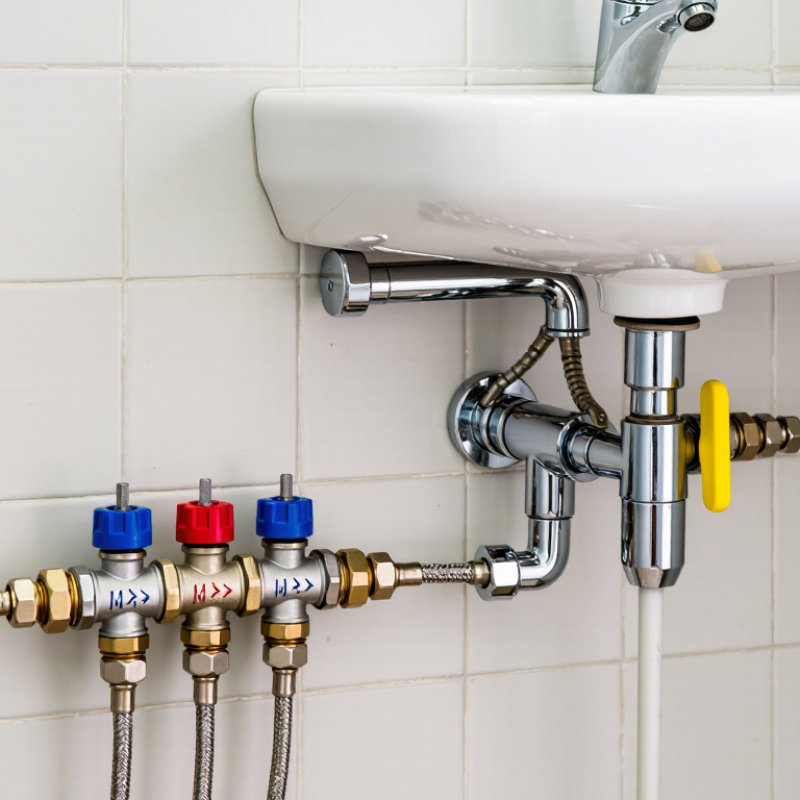
How to Install a Thermostatic Mixing Valve Properly
Identify the valve before opening the pipework. A point-of-use valve serves one fixture, while a central valve supplies several outlets. A thermostatic mixing valve differs from a pressure-balancing valve. It controls temperature, not only pressure changes. Check the body markings for hot, cold, and mixed-water connections. Flow arrows must match the actual pipe direction. Reversing the connections can cause unstable temperatures or complete failure. Confirm the valve’s flow rate, temperature range, connection size, and approved mounting position. Read the installation instructions carefully. Small details matter here.
Prepare adjustable wrenches, a pipe cutter, a deburring tool, measuring tape, and a calibrated thermometer. You may also need isolation valves, check valves, pipe supports, and approved thread sealant. Shut off both water supplies, then open a nearby outlet to release pressure. Flush the pipes before connecting the valve. Sediment can damage its internal cartridge. Keep the valve accessible for future servicing. Do not bury it behind a permanent wall. That mistake is expensive.
Install the hot and cold lines without forcing the fittings. Support nearby pipes to prevent strain on the valve body. After connection, open the supplies slowly and inspect every joint. Test the mixed outlet with a thermometer, not your hand. Touch is misleading. Adjust the temperature gradually, following the specified limit for the installation. I once treated a minor temperature fluctuation as harmless; trapped debris was the real problem. Rechecking the strainer and flushing the line would have saved time. Local plumbing requirements may also demand a final temperature test or additional protection.
| Installation Dimension | Recommended Information or Requirement | Why It Matters |
|---|---|---|
| Valve Type | Identify whether the valve is a point-of-use thermostatic mixing valve, a whole-house/distribution valve, or an integral valve supplied with a specific fixture. | Different valve designs have different flow capacities, connection arrangements, adjustment ranges, and installation locations. |
| Flow Direction | Connect the hot-water inlet, cold-water inlet, and mixed-water outlet according to the markings on the valve body. Do not assume that all valves use the same port layout. | Reversing the connections can prevent temperature regulation and may create a scalding hazard. |
| Installation Location | Install the valve where it can be accessed for inspection, cleaning, temperature adjustment, and servicing. Keep it protected from freezing and excessive heat. | Accessibility supports maintenance and helps the valve respond consistently over its service life. |
| Pipe Compatibility | Confirm that the valve connections match the pipe material, nominal size, thread type, and joining method used in the plumbing system. | Correct compatibility reduces leaks, connection damage, installation delays, and flow restrictions. |
| Required Tools | Adjustable wrenches or appropriately sized spanners, pipe cutter, deburring tool, measuring tape, level, thermometer, bucket, cleaning cloth, and suitable sealing materials. | Using the correct tools helps prevent damaged threads, uneven connections, contamination, and inaccurate temperature checks. |
| Pipe Sealing | Use a sealant or sealing method approved for potable-water service and compatible with the connection type. Keep sealant away from internal water passages. | Improper sealing can cause leaks or allow material to enter and interfere with the valve mechanism. |
| Shut-Off and Drainage | Turn off the water supply, isolate the water heater when required, open a nearby outlet, and drain pressure before cutting or disconnecting pipe. | This reduces the risk of flooding, burns, uncontrolled water release, and accidental equipment operation. |
| Backflow Protection | Install check valves or strainers only when required by the valve design, local plumbing rules, or the system layout. | Backflow protection can prevent unwanted cross-connection between hot and cold supplies, but incorrect placement may restrict flow. |
| Water Pressure | Verify that hot- and cold-water pressures are within the valve manufacturer's stated operating range and are reasonably balanced. | Large pressure differences can cause unstable outlet temperature or reduced flow performance. |
| Temperature Setting | Set the mixed-water temperature using a calibrated thermometer. A commonly used safety target for handwashing and bathing is approximately 38–43°C (100–110°F), subject to local requirements and application needs. | The correct setting helps balance comfort, scald prevention, and the intended use of the fixture or distribution system. |
| Scald Protection | Confirm that the valve includes an effective high-temperature limit or failsafe function where required, and test the response by varying the hot-water supply. | A properly functioning thermostatic element should reduce the risk of dangerously hot outlet water after a supply-pressure or temperature change. |
| Flushing the System | Flush hot and cold lines before final commissioning to remove solder, pipe chips, dirt, and other construction debris. Remove or clean strainers if the valve design provides them. | Debris can clog screens, damage the thermostatic cartridge, or cause inconsistent temperature control. |
| Leak Test | Restore water pressure gradually and inspect every connection, valve body, and outlet for leakage. Dry the joints before checking for new moisture. | Gradual pressurization makes it easier to identify leaks before they cause water damage. |
| Functional Test | Run the outlet at its normal flow, measure the mixed-water temperature, and verify stable delivery while hot- and cold-water demand changes. | Testing confirms that the valve is installed correctly and responds as intended under realistic operating conditions. |
| Insulation and Support | Support the connected pipework independently where necessary and insulate hot-water pipes without obstructing the valve's adjustment or service access. | Proper support limits mechanical stress, while insulation helps reduce heat loss and temperature fluctuation. |
| Maintenance Interval | Inspect temperature performance, connections, strainers, check valves, and the thermostatic cartridge according to the valve instructions and local water conditions. | Scale, corrosion, and debris may reduce response accuracy and flow over time, especially in hard-water systems. |
| Code and Safety Compliance | Follow applicable plumbing, potable-water, accessibility, and scald-prevention requirements. Use a qualified plumbing professional where local rules require one. | Local requirements may specify valve approval, temperature limits, installation methods, testing, and protection against cross-connection. |
Correct orientation supports stable temperature control. Match the hot, cold, and mixed-water arrows with the proper pipes. Appearance can mislead.
Connect the heated-water pipe to the marked hot inlet. Connect the cold pipe to the cold inlet. The mixed outlet serves the fixture.
Shut off the water supply and open a nearby tap. This releases pressure. Flush both pipes to remove grit and debris.
Use suitable connectors and approved thread sealant. Tighten fittings firmly, but do not force them. Excessive pressure may crack the valve body.
Keep the markings visible and the adjustment mechanism accessible. Support nearby pipes so their weight does not hang from the valve.
Open the water supply slowly. Wipe every joint with a dry cloth or tissue. A small damp spot can reveal a poor seal.
Let the outlet run for several minutes. Measure temperature at the fixture with a reliable thermometer. Do not test using your hand.
Turn the control gradually in small increments. Wait between changes because the temperature may respond slowly. Recheck after the flow stabilizes.
Check it after the pipes warm and normal conditions return. Record the final temperature and adjustment position. A quiet pipe proves little.
Recheck the hot and cold connections, flow markings, debris, and valve alignment. My first reading was sometimes inconsistent. Patience matters here.
Learning how to install a thermostatic mixing valve properly begins with identifying the correct valve type and reviewing the manufacturer’s installation requirements. Gather essential tools, then shut off the water supply and drain the relevant pipes. Prepare clean, correctly sized connections, checking that the hot and cold lines are clearly identified before installation.
Position the valve according to its flow-direction markings and orientation requirements. Connect the hot and cold water lines securely, then attach the mixed-water outlet and tighten all fittings without over-tightening. Restore the water supply gradually and inspect every connection for leaks. Test the outlet temperature with a reliable thermometer, allowing the valve to stabilize before making small adjustments. Confirm that the water remains at a safe, consistent temperature under normal flow conditions, and retest after any adjustment. Proper preparation, careful alignment, and thorough testing help ensure dependable performance and comfortable temperature control.

 Flow Faucet